
1. ਜਾਣ-ਪਛਾਣ
This manual provides detailed instructions for the installation, operation, and maintenance of your Crunch SA-2100.4 Smash Series 4-Channel Class AB Car Audio Ampਲਾਈਫਾਇਰ। ਕਿਰਪਾ ਕਰਕੇ ਇੰਸਟਾਲੇਸ਼ਨ ਜਾਂ ਸੰਚਾਲਨ ਦੀ ਕੋਸ਼ਿਸ਼ ਕਰਨ ਤੋਂ ਪਹਿਲਾਂ ਇਸ ਮੈਨੂਅਲ ਨੂੰ ਚੰਗੀ ਤਰ੍ਹਾਂ ਪੜ੍ਹੋ ਤਾਂ ਜੋ ਸਹੀ ਵਰਤੋਂ ਨੂੰ ਯਕੀਨੀ ਬਣਾਇਆ ਜਾ ਸਕੇ ਅਤੇ ਯੂਨਿਟ ਜਾਂ ਤੁਹਾਡੇ ਵਾਹਨ ਦੇ ਆਡੀਓ ਸਿਸਟਮ ਨੂੰ ਨੁਕਸਾਨ ਤੋਂ ਬਚਾਇਆ ਜਾ ਸਕੇ।
The Crunch SA-2100.4 amplifier is designed to deliver reliable power and performance for your car audio setup, featuring a robust design and flexible configuration options.
2 ਸੁਰੱਖਿਆ ਜਾਣਕਾਰੀ
- ਕੋਈ ਵੀ ਬਿਜਲੀ ਦਾ ਕੰਮ ਸ਼ੁਰੂ ਕਰਨ ਤੋਂ ਪਹਿਲਾਂ ਹਮੇਸ਼ਾ ਵਾਹਨ ਦੇ ਬੈਟਰੀ ਨੈਗੇਟਿਵ ਟਰਮੀਨਲ ਨੂੰ ਡਿਸਕਨੈਕਟ ਕਰੋ।
- Ensure all wiring is properly routed and secured to prevent pinching, cutting, or short circuits.
- ਇਸ ਮੈਨੂਅਲ ਵਿੱਚ ਦੱਸੇ ਅਨੁਸਾਰ ਪਾਵਰ ਅਤੇ ਜ਼ਮੀਨੀ ਕਨੈਕਸ਼ਨਾਂ ਲਈ ਢੁਕਵੀਂ ਗੇਜ ਵਾਇਰਿੰਗ ਦੀ ਵਰਤੋਂ ਕਰੋ।
- ਨੂੰ ਸਥਾਪਿਤ ਕਰੋ ampਲਾਈਫਾਇਰ ਨੂੰ ਅਜਿਹੀ ਜਗ੍ਹਾ 'ਤੇ ਰੱਖੋ ਜੋ ਜ਼ਿਆਦਾ ਗਰਮ ਹੋਣ ਤੋਂ ਰੋਕਣ ਲਈ ਢੁਕਵੀਂ ਹਵਾਦਾਰੀ ਦੀ ਆਗਿਆ ਦਿੰਦਾ ਹੈ।
- ਨੂੰ ਮਾਊਂਟ ਕਰਨ ਤੋਂ ਬਚੋ ampਨਮੀ ਜਾਂ ਬਹੁਤ ਜ਼ਿਆਦਾ ਵਾਈਬ੍ਰੇਸ਼ਨ ਦੇ ਸੰਪਰਕ ਵਿੱਚ ਆਉਣ ਵਾਲੇ ਖੇਤਰਾਂ ਵਿੱਚ ਲਿਫਾਇਰ।
- ਜੇਕਰ ਤੁਸੀਂ ਇੰਸਟਾਲੇਸ਼ਨ ਪ੍ਰਕਿਰਿਆ ਦੇ ਕਿਸੇ ਵੀ ਹਿੱਸੇ ਬਾਰੇ ਅਨਿਸ਼ਚਿਤ ਹੋ, ਤਾਂ ਕਿਸੇ ਪੇਸ਼ੇਵਰ ਕਾਰ ਆਡੀਓ ਇੰਸਟਾਲਰ ਨਾਲ ਸਲਾਹ ਕਰੋ।
3. ਪੈਕੇਜ ਸਮੱਗਰੀ
ਪੁਸ਼ਟੀ ਕਰੋ ਕਿ ਸਾਰੀਆਂ ਚੀਜ਼ਾਂ ਪੈਕੇਜ ਵਿੱਚ ਮੌਜੂਦ ਹਨ:
- Crunch SA-2100.4 4-Channel Class AB Ampਵਧੇਰੇ ਜੀਵਤ
- ਉਪਭੋਗਤਾ ਮੈਨੁਅਲ (ਇਹ ਦਸਤਾਵੇਜ਼)
- ਮਾਊਂਟਿੰਗ ਹਾਰਡਵੇਅਰ (ਪੇਚ, ਆਦਿ)
- Note: The Gravity Magnet Phone Holder is a separate bundled item and not part of the amplifier's core package.
4. Ampਲਾਈਫਾਇਰ ਵਿਸ਼ੇਸ਼ਤਾਵਾਂ
The Crunch SA-2100.4 ampਲਾਈਫਾਇਰ ਹੇਠ ਲਿਖੀਆਂ ਮੁੱਖ ਵਿਸ਼ੇਸ਼ਤਾਵਾਂ ਦੀ ਪੇਸ਼ਕਸ਼ ਕਰਦਾ ਹੈ:
- 4 channels x 85 watts at 2 ohms
- 4 channels x 65 watts at 4 ohms
- 2 channels x 130 watts (mono bridged) at 4 ohms
- Operates in 4-channel stereo, dual stereo bridged, stereo + bridged mono, or dual bridged mono configurations.
- Fully adjustable variable electronic crossover: 12 dB per octave.
- Integrated heat sink for thermal management.
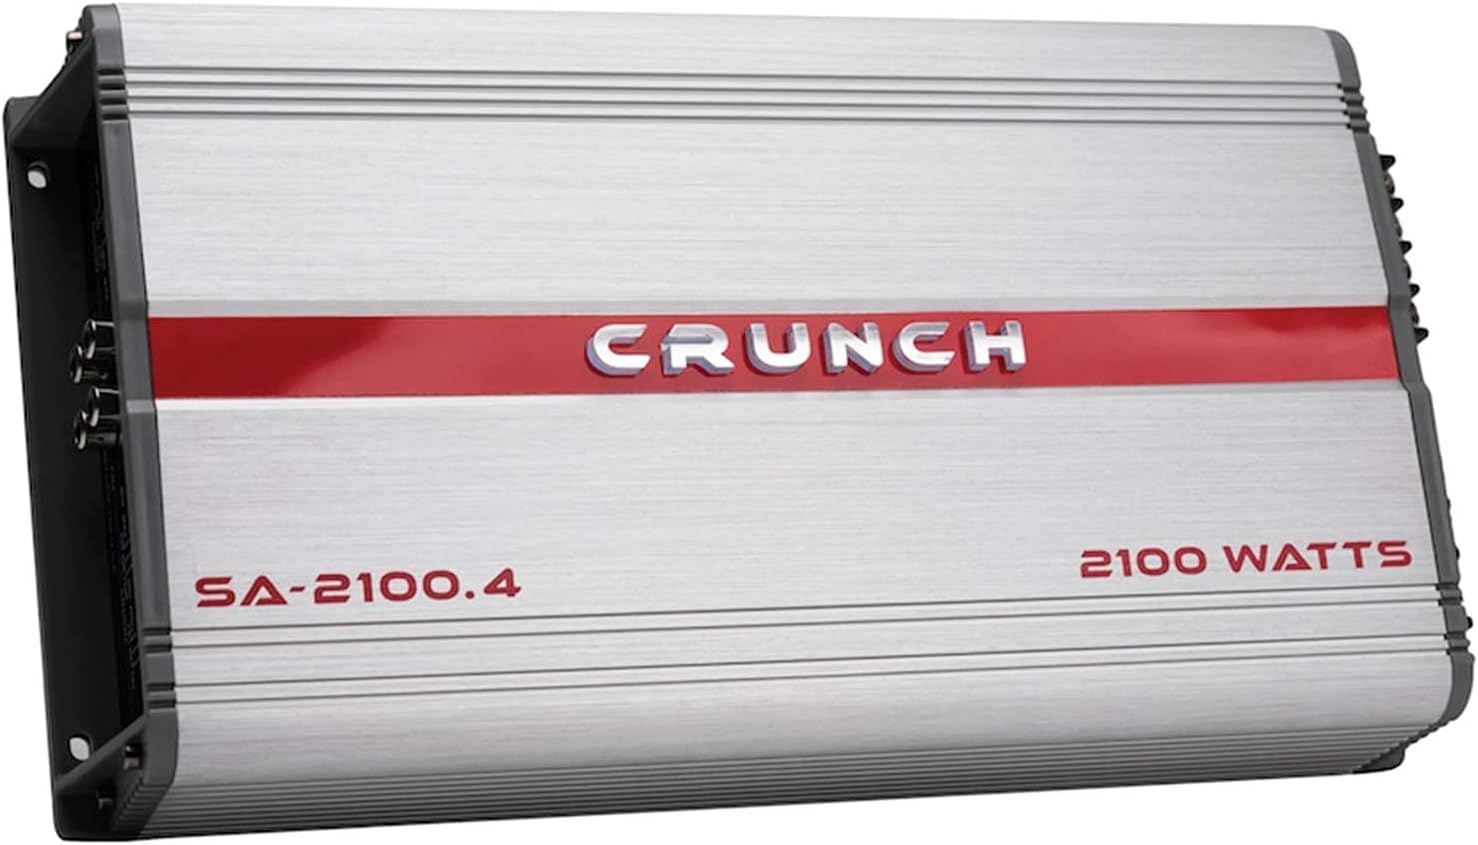
ਚਿੱਤਰ 4.1: ਸਿਖਰ view of the Crunch SA-2100.4 ampਲਾਈਫਾਇਰ, ਸ਼ੋਅਕasing its brushed aluminum finish and red Crunch logo. This view highlights the compact design and robust casing.
5. ਸਥਾਪਨਾ
.5.1..XNUMX ਮਾ Mountਟ ਟਿਕਾਣਾ
Choose a mounting location that is dry, well-ventilated, and protected from direct sunlight or excessive heat. Common locations include under seats, in the trunk, or behind panels. Ensure the amplifier is securely fastened to a solid surface to prevent movement during vehicle operation.
5.2 ਵਾਇਰਿੰਗ ਕਨੈਕਸ਼ਨ
Refer to the diagrams below for proper wiring connections. Use high-quality wiring components for optimal performance and safety.

ਚਿੱਤਰ 5.1: Rear panel of the Crunch SA-2100.4 amplifier, showing power input terminals (GND, REM, +12V), dual 30A fuses, and speaker output terminals for channels 1-4, including bridged options.
5.2.1 ਪਾਵਰ ਕਨੈਕਸ਼ਨ
- GND (ਜ਼ਮੀਨ): Connect to a clean, bare metal point on the vehicle chassis. Ensure a solid connection to prevent noise and ensure proper operation. Use a wire of the same gauge as the +12V power wire.
- REM (ਰਿਮੋਟ ਟਰਨ-ਆਨ): ਆਪਣੇ ਹੈੱਡ ਯੂਨਿਟ ਦੇ ਰਿਮੋਟ ਟਰਨ-ਆਨ ਆਉਟਪੁੱਟ ਨਾਲ ਜੁੜੋ। ਇਹ ਤਾਰ ਸੰਕੇਤ ਦਿੰਦਾ ਹੈ ampਤੁਹਾਡੇ ਆਡੀਓ ਸਿਸਟਮ ਨਾਲ ਚਾਲੂ ਅਤੇ ਬੰਦ ਕਰਨ ਲਈ ਲਾਈਫਾਇਰ।
- +12V (ਪਾਵਰ): Connect directly to the positive terminal of the vehicle's battery. Install an in-line fuse holder (not supplied) within 18 inches (45 cm) of the battery, with a fuse rating appropriate for the amplifier (e.g., 60A total for two 30A fuses).
5.2.2 ਸਪੀਕਰ ਆਉਟਪੁੱਟ ਕਨੈਕਸ਼ਨ
Connect your speakers to the appropriate terminals. The amplifier supports 4-channel stereo, dual stereo bridged, stereo + bridged mono, or dual bridged mono configurations. Ensure correct polarity (+ to + and - to -) for all speakers.
- CH1, CH2, CH3, CH4: Individual speaker outputs for stereo operation.
- Bridged (CH1/CH2, CH3/CH4): For higher power output to a single speaker (e.g., a subwoofer), connect to the designated bridged terminals. Minimum impedance for bridged operation is 4 ohms.
5.2.3 ਇਨਪੁਟ ਕਨੈਕਸ਼ਨ
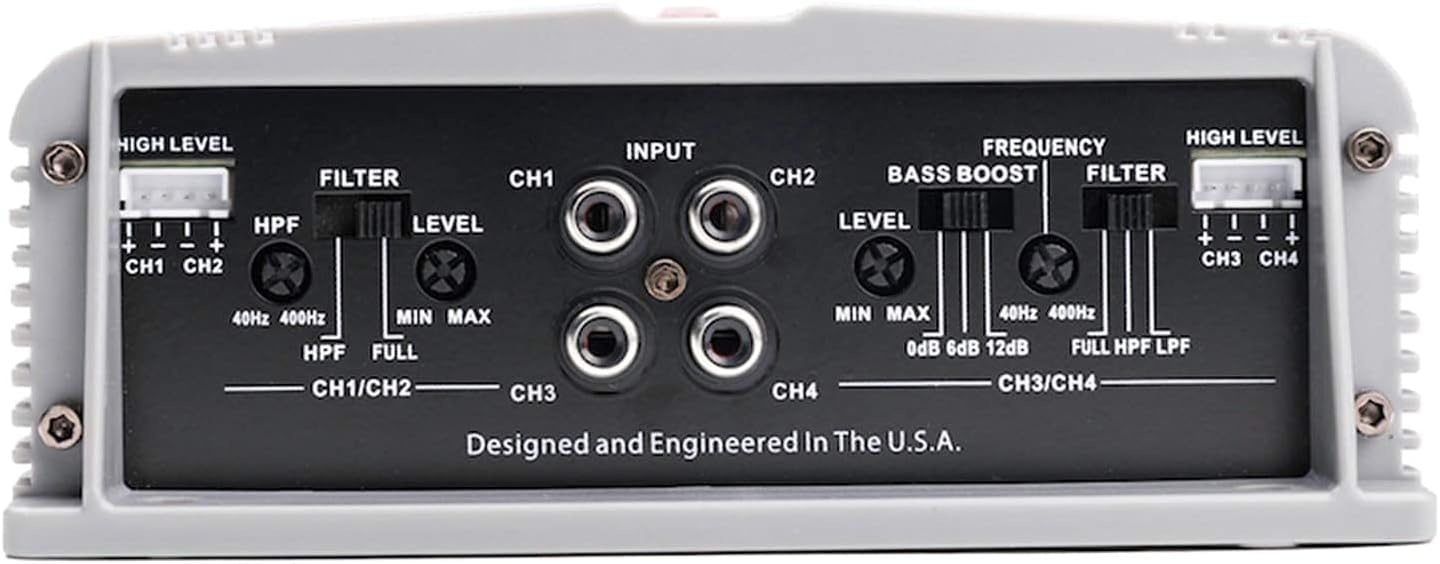
ਚਿੱਤਰ 5.2: Front panel of the Crunch SA-2100.4 amplifier, displaying RCA input jacks for channels 1-4, high-level input connectors, and various control knobs for filter, level, bass boost, and frequency adjustments.
- RCA ਇਨਪੁੱਟ (CH1, CH2, CH3, CH4): ਆਪਣੇ ਹੈੱਡ ਯੂਨਿਟ ਦੇ ਪ੍ਰੀ- ਤੋਂ RCA ਕੇਬਲਾਂ ਨੂੰ ਜੋੜੋ-amp outputs to these jacks.
- High Level Input (CH1/CH2, CH3/CH4): If your head unit does not have RCA outputs, use the high-level input connectors. Connect speaker-level wires from your head unit's speaker outputs to these inputs.
6. Controls and Adjustments
ਦਾ ਫਰੰਟ ਪੈਨਲ amplifier features several controls for fine-tuning your audio system (refer to Image 5.2):
- FILTER (HPF/FULL/LPF):
- HPF (ਹਾਈ ਪਾਸ ਫਿਲਟਰ): Allows frequencies above the set frequency to pass through. Useful for protecting smaller speakers from low bass.
- ਪੂਰਾ: Allows the full frequency range to pass through.
- LPF (ਘੱਟ ਪਾਸ ਫਿਲਟਰ): Allows frequencies below the set frequency to pass through. Useful for subwoofers.
- LEVEL (Min/Max): ਦੀ ਇਨਪੁਟ ਸੰਵੇਦਨਸ਼ੀਲਤਾ ਨੂੰ ਵਿਵਸਥਿਤ ਕਰਦਾ ਹੈ ampਆਉਟਪੁੱਟ ਵਾਲੀਅਮ ਨਾਲ ਮੇਲ ਕਰਨ ਲਈ ਲਾਈਫਾਇਰtage of your head unit. Start at minimum and slowly increase until desired volume is achieved without distortion.
- BASS BOOST (0dB/6dB/12dB): Provides an adjustable bass enhancement at a specific frequency. Use sparingly to avoid distortion.
- FREQUENCY (40Hz-400Hz): Adjusts the cutoff frequency for the High Pass and Low Pass filters.
7. ਓਪਰੇਟਿੰਗ ਹਦਾਇਤਾਂ
- Ensure all connections are secure and correct before powering on the system.
- ਆਪਣੇ ਵਾਹਨ ਦੀ ਇਗਨੀਸ਼ਨ ਅਤੇ ਹੈੱਡ ਯੂਨਿਟ ਚਾਲੂ ਕਰੋ। amplifier should power on automatically via the remote turn-on wire.
- ਦੇ ਨਾਲ ਸ਼ੁਰੂ ਕਰੋ amplifier's LEVEL control at its minimum setting.
- Play a familiar piece of music through your head unit at about 75% of its maximum volume.
- ਹੌਲੀ ਹੌਲੀ ਵਧਾਓ amplifier's LEVEL control until you hear slight distortion, then back it off slightly until the sound is clear.
- Adjust the FILTER, FREQUENCY, and BASS BOOST controls to achieve your desired sound balance.
- When turning off the system, the amplifier will power down automatically with the head unit.
8. ਰੱਖ-ਰਖਾਅ
- ਸਫਾਈ: ਸਮੇਂ-ਸਮੇਂ 'ਤੇ ਪੂੰਝੋ ampਲਿਫਾਇਰ ਦੇ ਬਾਹਰੀ ਹਿੱਸੇ ਨੂੰ ਨਰਮ, ਸੁੱਕੇ ਕੱਪੜੇ ਨਾਲ ਸਾਫ਼ ਕਰੋ। ਕਠੋਰ ਰਸਾਇਣਾਂ ਜਾਂ ਘਸਾਉਣ ਵਾਲੇ ਕਲੀਨਰ ਦੀ ਵਰਤੋਂ ਨਾ ਕਰੋ।
- ਕਨੈਕਸ਼ਨ: Regularly check all power, ground, remote, and speaker connections to ensure they are tight and free from corrosion. Loose connections can lead to poor performance or damage.
- ਹਵਾਦਾਰੀ: ਯਕੀਨੀ ਬਣਾਓ ਕਿ ampਲਾਈਫਾਇਰ ਦੇ ਹੀਟ ਸਿੰਕ ਫਿਨਸ ਸਹੀ ਕੂਲਿੰਗ ਬਣਾਈ ਰੱਖਣ ਲਈ ਧੂੜ ਅਤੇ ਮਲਬੇ ਤੋਂ ਮੁਕਤ ਹੁੰਦੇ ਹਨ।
- ਫਿusesਜ਼: ਜੇਕਰ ਦ amplifier fails to power on, check the fuses on the rear panel (Image 5.1). Replace blown fuses only with fuses of the same type and rating (30A).
9. ਸਮੱਸਿਆ ਨਿਪਟਾਰਾ
| ਸਮੱਸਿਆ | ਸੰਭਵ ਕਾਰਨ | ਹੱਲ |
|---|---|---|
| ਬਿਜਲੀ ਨਹੀਂ / Ampਲਾਈਫਾਇਰ ਚਾਲੂ ਨਹੀਂ ਹੁੰਦਾ |
|
|
| ਕੋਈ ਧੁਨੀ ਆਉਟਪੁੱਟ ਨਹੀਂ |
|
|
| ਵਿਗੜਿਆ ਧੁਨੀ |
|
|
| Ampਲਿਫਾਇਰ ਓਵਰਹੀਟਿੰਗ |
|
|
10 ਨਿਰਧਾਰਨ
| ਵਿਸ਼ੇਸ਼ਤਾ | ਨਿਰਧਾਰਨ |
|---|---|
| ਮਾਡਲ | SA-2100.4 |
| ਚੈਨਲ | 4 |
| ਕਲਾਸ | AB |
| RMS ਪਾਵਰ (4 Ohms) | 4 ਐਕਸ 65 ਵਾਟ |
| RMS ਪਾਵਰ (2 Ohms) | 4 ਐਕਸ 85 ਵਾਟ |
| RMS ਪਾਵਰ (4 Ohms ਬ੍ਰਿਜਡ) | 2 ਐਕਸ 130 ਵਾਟ |
| ਕਰਾਸਓਵਰ | Variable Electronic (12 dB/octave) |
| ਫਿਲਟਰ ਰੇਂਜ | 40Hz - 400Hz |
| ਬਾਸ ਬੂਸਟ | 0dB, 6dB, 12dB |
| ਫਿਊਜ਼ | 2 x 30A |
| ਸਮੱਗਰੀ | ਧਾਤੂ |
| ਆਈਟਮ ਦਾ ਭਾਰ | 5.5 ਪੌਂਡ |
| ਮਾਪ (L x W x H) | ਲਗਭਗ 15.94 x 8.43 x 4.25 ਇੰਚ (ਪੈਕੇਜ ਮਾਪ) |
| ਯੂ.ਪੀ.ਸੀ | 789591810068 |
11. ਵਾਰੰਟੀ ਅਤੇ ਸਹਾਇਤਾ
Crunch products are designed for reliability and performance. For specific warranty terms and conditions, please refer to the warranty card included with your product or visit the official Crunch website. For technical support or service inquiries, please contact Crunch customer service through their official channels.
ਵਾਰੰਟੀ ਦੇ ਦਾਅਵਿਆਂ ਲਈ ਖਰੀਦ ਦੇ ਸਬੂਤ ਵਜੋਂ ਆਪਣੀ ਖਰੀਦ ਰਸੀਦ ਰੱਖੋ।