1. ਜਾਣ-ਪਛਾਣ
This manual provides detailed instructions for the proper use and maintenance of your BAOFENG UV-32 10W Ham Radio. The UV-32 is a multi-band two-way radio featuring 10W selectable power, GPS navigation, a 2.0-inch color display, and multiple programming options including wireless app connectivity. Please read this manual thoroughly before operating the device to ensure safe and efficient communication.
2 ਸੁਰੱਖਿਆ ਜਾਣਕਾਰੀ
Observe the following safety precautions to prevent injury or damage to the radio:
- ਰੇਡੀਓ ਨੂੰ ਵਿਸਫੋਟਕ ਵਾਯੂਮੰਡਲ (ਜਿਵੇਂ ਕਿ ਜਲਣਸ਼ੀਲ ਗੈਸਾਂ, ਧੂੜ ਦੇ ਕਣ, ਧਾਤੂ ਪਾਊਡਰ) ਵਿੱਚ ਨਾ ਚਲਾਓ।
- Do not transmit without an antenna connected.
- Keep the antenna at least 2.5 cm (1 inch) away from your body when transmitting.
- Use only BAOFENG-approved batteries and chargers. Unauthorized accessories may cause damage or fire.
- ਰੇਡੀਓ ਨੂੰ ਨਾ ਤੋੜੋ ਜਾਂ ਸੋਧੋ। ਮੁਰੰਮਤ ਸਿਰਫ਼ ਯੋਗ ਤਕਨੀਸ਼ੀਅਨਾਂ ਦੁਆਰਾ ਹੀ ਕੀਤੀ ਜਾਣੀ ਚਾਹੀਦੀ ਹੈ।
- ਸਿੱਧੀ ਧੁੱਪ ਜਾਂ ਬਹੁਤ ਜ਼ਿਆਦਾ ਤਾਪਮਾਨਾਂ ਦੇ ਲੰਬੇ ਸਮੇਂ ਤੱਕ ਸੰਪਰਕ ਤੋਂ ਬਚੋ।
- Do not operate the radio while driving or performing other activities that require full attention.
3. ਪੈਕੇਜ ਸਮੱਗਰੀ
ਪੁਸ਼ਟੀ ਕਰੋ ਕਿ ਸਾਰੀਆਂ ਚੀਜ਼ਾਂ ਤੁਹਾਡੇ ਪੈਕੇਜ ਵਿੱਚ ਮੌਜੂਦ ਹਨ:
- 1 x BAOFENG UV-32 Radio
- 1 x 2500mAh ਬੈਟਰੀ
- 1 x USB-C Charger
- 1 x Desktop Charger Base
- 1 x Standard UV Antenna
- 1 x Long Airband Antenna
- 1 ਐਕਸ ਹੈੱਡਸੈੱਟ
- 1 x ਬੈਲਟ ਕਲਿੱਪ
- 1 x Radio Case Holder

Image: The BAOFENG UV-32 radio shown with its complete set of accessories, including the battery, charger, antennas, headset, belt clip, and case holder.
4. ਉਤਪਾਦ ਖਤਮview
Familiarize yourself with the main components of your UV-32 radio.

ਚਿੱਤਰ: ਸਾਹਮਣੇ view of the BAOFENG UV-32 radio, highlighting the 2.0-inch color display, alphanumeric keypad, and function buttons.
ਮੁੱਖ ਭਾਗ:
- ਐਂਟੀਨਾ ਕਨੈਕਟਰ: For attaching the standard UV or airband antenna.
- ਪਾਵਰ/ਵਾਲੀਅਮ ਨੌਬ: ਰੇਡੀਓ ਨੂੰ ਚਾਲੂ/ਬੰਦ ਕਰਦਾ ਹੈ ਅਤੇ ਆਵਾਜ਼ ਨੂੰ ਐਡਜਸਟ ਕਰਦਾ ਹੈ।
- ਡਿਸਪਲੇ: 2.0-inch color screen showing frequency, channel, battery status, and other indicators.
- PTT ਬਟਨ: ਸੰਚਾਰ ਲਈ ਪੁਸ਼-ਟੂ-ਟਾਕ ਬਟਨ।
- Side Keys (P1, P2): Customizable function keys.
- ਕੀਪੈਡ: Alphanumeric input for frequencies, channels, and menu navigation.
- USB-C ਚਾਰਜਿੰਗ ਪੋਰਟ: For direct battery charging.
- ਸਹਾਇਕ ਜੈਕ: For connecting the headset or programming cable.
5. ਸੈੱਟਅੱਪ
5.1 ਬੈਟਰੀ ਇੰਸਟਾਲੇਸ਼ਨ ਅਤੇ ਚਾਰਜਿੰਗ
- Align the 2500mAh Li-ion battery with the grooves on the back of the radio.
- ਬੈਟਰੀ ਨੂੰ ਉੱਪਰ ਵੱਲ ਸਲਾਈਡ ਕਰੋ ਜਦੋਂ ਤੱਕ ਇਹ ਆਪਣੀ ਜਗ੍ਹਾ 'ਤੇ ਨਾ ਆ ਜਾਵੇ।
- To charge, connect the USB-C charger directly to the battery's USB-C port or place the radio with the battery attached into the desktop charging base.
- The charging indicator on the desktop base will show red during charging and green when fully charged.

Image: A close-up of the 2500mAh Li-ion battery for the UV-32, highlighting its integrated USB-C charging port.
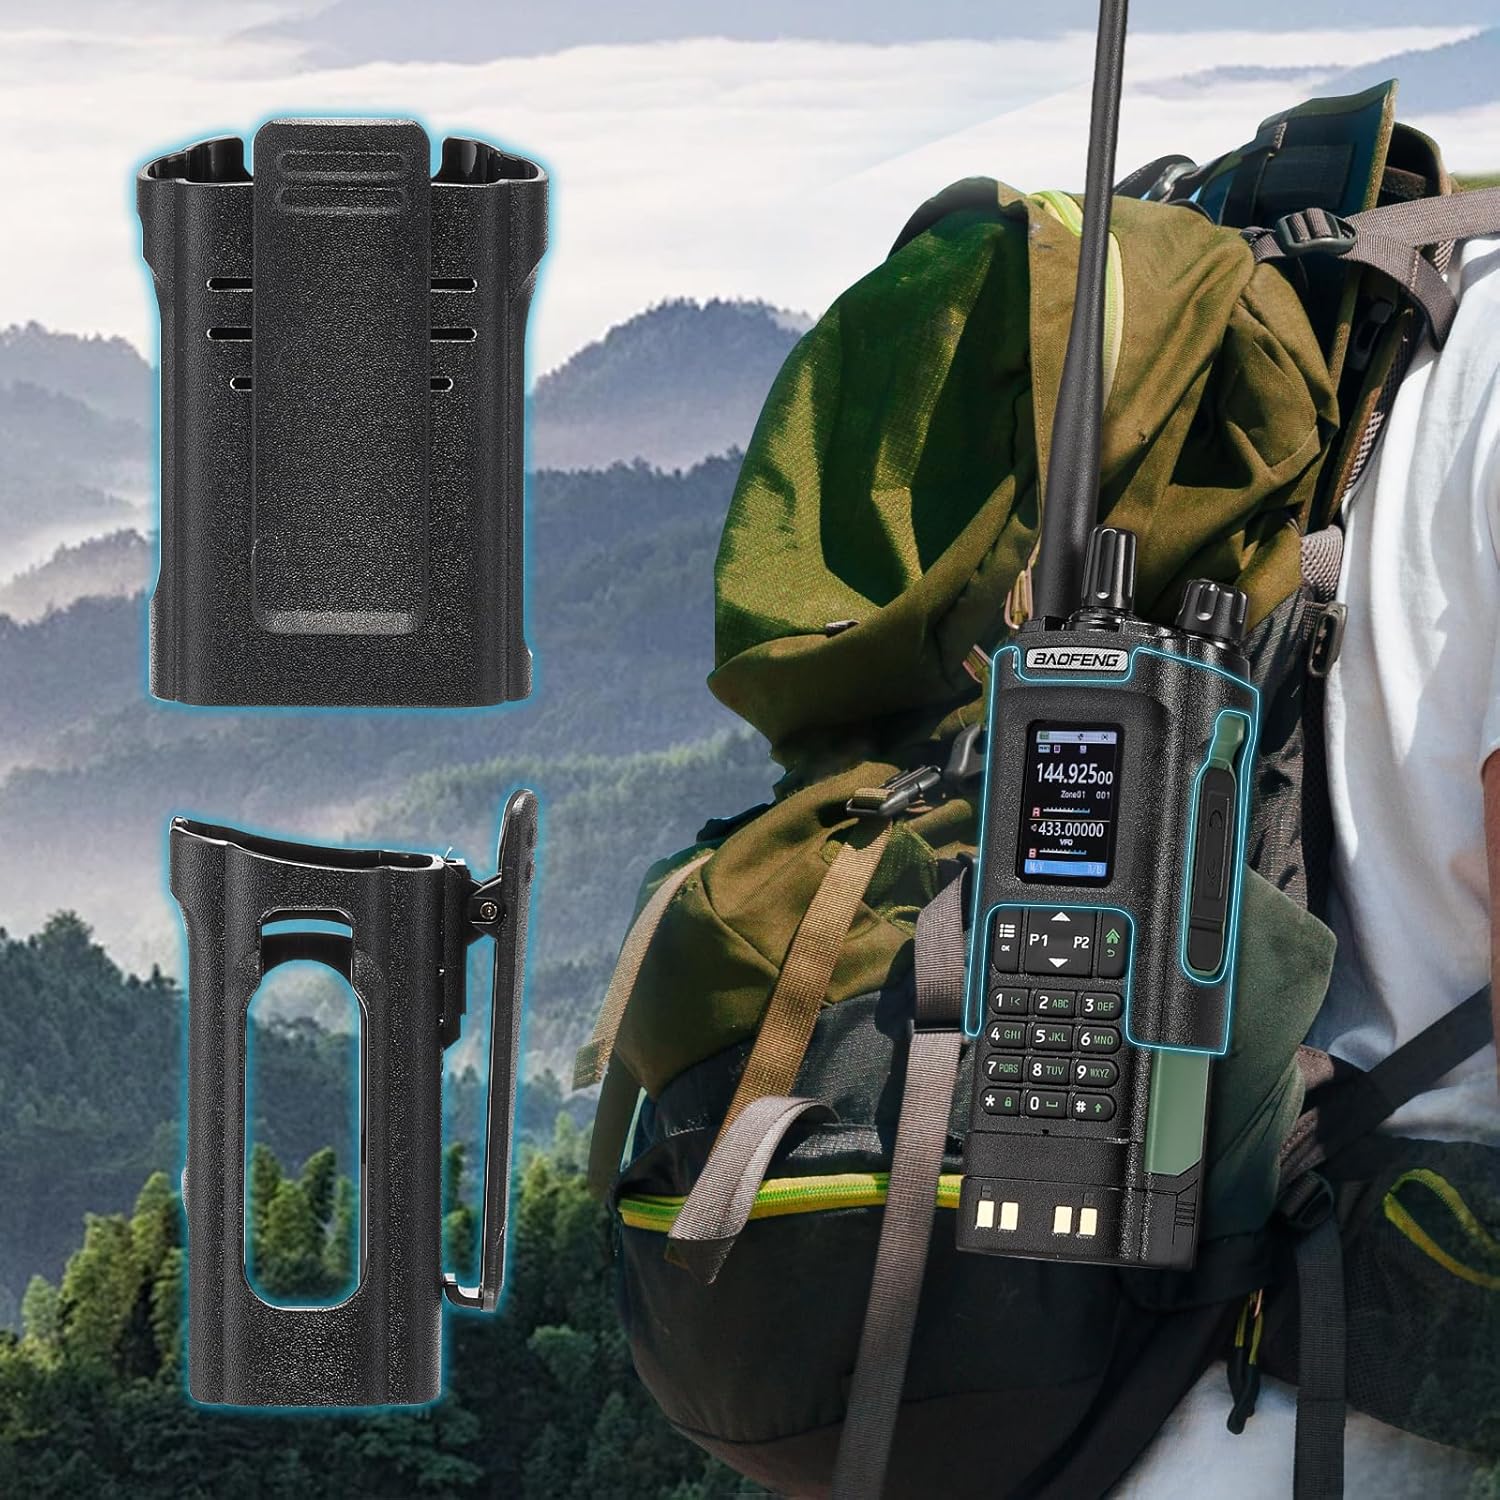
Image: The BAOFENG UV-32 radio demonstrating both direct USB-C charging and charging via its desktop cradle.
5.2 ਐਂਟੀਨਾ ਇੰਸਟਾਲੇਸ਼ਨ
- Select the appropriate antenna: the standard UV antenna for general VHF/UHF use or the long airband antenna for enhanced aviation signal reception.
- Screw the chosen antenna clockwise onto the antenna connector at the top of the radio until it is finger-tight. Do not overtighten.

Image: The BAOFENG UV-32 radio illustrating the use of two different antennas: a standard antenna for UHF/VHF and a longer antenna specifically designed for airband reception.
5.3 Belt Clip Installation
- ਬੈਲਟ ਕਲਿੱਪ ਨੂੰ ਰੇਡੀਓ ਦੇ ਪਿਛਲੇ ਪਾਸੇ ਪੇਚ ਦੇ ਛੇਕਾਂ ਨਾਲ ਇਕਸਾਰ ਕਰੋ।
- ਦਿੱਤੇ ਗਏ ਪੇਚਾਂ ਦੀ ਵਰਤੋਂ ਕਰਕੇ ਬੈਲਟ ਕਲਿੱਪ ਨੂੰ ਸੁਰੱਖਿਅਤ ਕਰੋ।
- The radio case holder can be used to attach the radio to a backpack or belt for secure carrying.

Image: The BAOFENG UV-32 radio securely mounted to a backpack strap using its belt clip and an additional case holder, demonstrating portability.
6. ਰੇਡੀਓ ਦਾ ਸੰਚਾਲਨ ਕਰਨਾ
6.1 ਪਾਵਰ ਚਾਲੂ/ਬੰਦ ਅਤੇ ਵਾਲੀਅਮ
Rotate the Power/Volume knob clockwise to turn the radio on and increase volume. Rotate counter-clockwise to decrease volume and turn the radio off.
6.2 ਡਿਸਪਲੇਅ ਓਵਰview
The 2.0-inch color display provides essential information:
- Frequency/Channel: Displays the current operating frequency or channel number.
- ਬੈਟਰੀ ਪੱਧਰ: ਬਾਕੀ ਬੈਟਰੀ ਚਾਰਜ ਨੂੰ ਦਰਸਾਉਂਦਾ ਹੈ।
- ਸਿਗਨਲ ਦੀ ਤਾਕਤ: Shows the strength of received signals.
- ਮੋਡ ਸੂਚਕ: Icons for various functions like GPS, Bluetooth, power level, etc.

Image: A close-up of the BAOFENG UV-32's 2-inch color display, showing detailed frequency, channel, and status information.
6.3 Channel Mode vs. Frequency Mode
The radio operates in two primary modes:
- ਬਾਰੰਬਾਰਤਾ ਮੋਡ (VFO): Allows direct input of frequencies for scanning or temporary use.
- ਚੈਨਲ ਮੋਡ (MR): Uses pre-programmed channels for quick access to stored frequencies.
ਦਬਾਓ ਮੀਨੂ button and navigate to the mode setting to switch between VFO and MR modes.
6.4 ਬਾਰੰਬਾਰਤਾ ਦੀ ਚੋਣ
- ਕੀਪੈਡ: In Frequency Mode, directly enter the desired frequency using the numeric keypad.
- Quick Channel Knob: Rotate the top knob to quickly scroll through frequencies or channels.
- ਉੱਪਰ/ਹੇਠਾਂ ਤੀਰ: Use the arrow keys (P1/P2) to fine-tune frequencies or navigate channels.
6.5 ਸੰਚਾਰਿਤ ਅਤੇ ਪ੍ਰਾਪਤ ਕਰਨਾ
- Ensure an antenna is properly connected.
- Select the desired frequency or channel.
- ਪ੍ਰਸਾਰਿਤ ਕਰਨ ਲਈ, ਦਬਾਓ ਅਤੇ ਹੋਲਡ ਕਰੋ ਪੀ.ਟੀ.ਟੀ button on the side of the radio. Speak clearly into the microphone.
- ਨੂੰ ਜਾਰੀ ਕਰੋ ਪੀ.ਟੀ.ਟੀ button to stop transmitting and return to receive mode.
- ਪਾਵਰ ਪੱਧਰ: The UV-32 offers High (H), Medium (M), and Low (L) power settings. Adjust this in the menu to balance range and battery life.
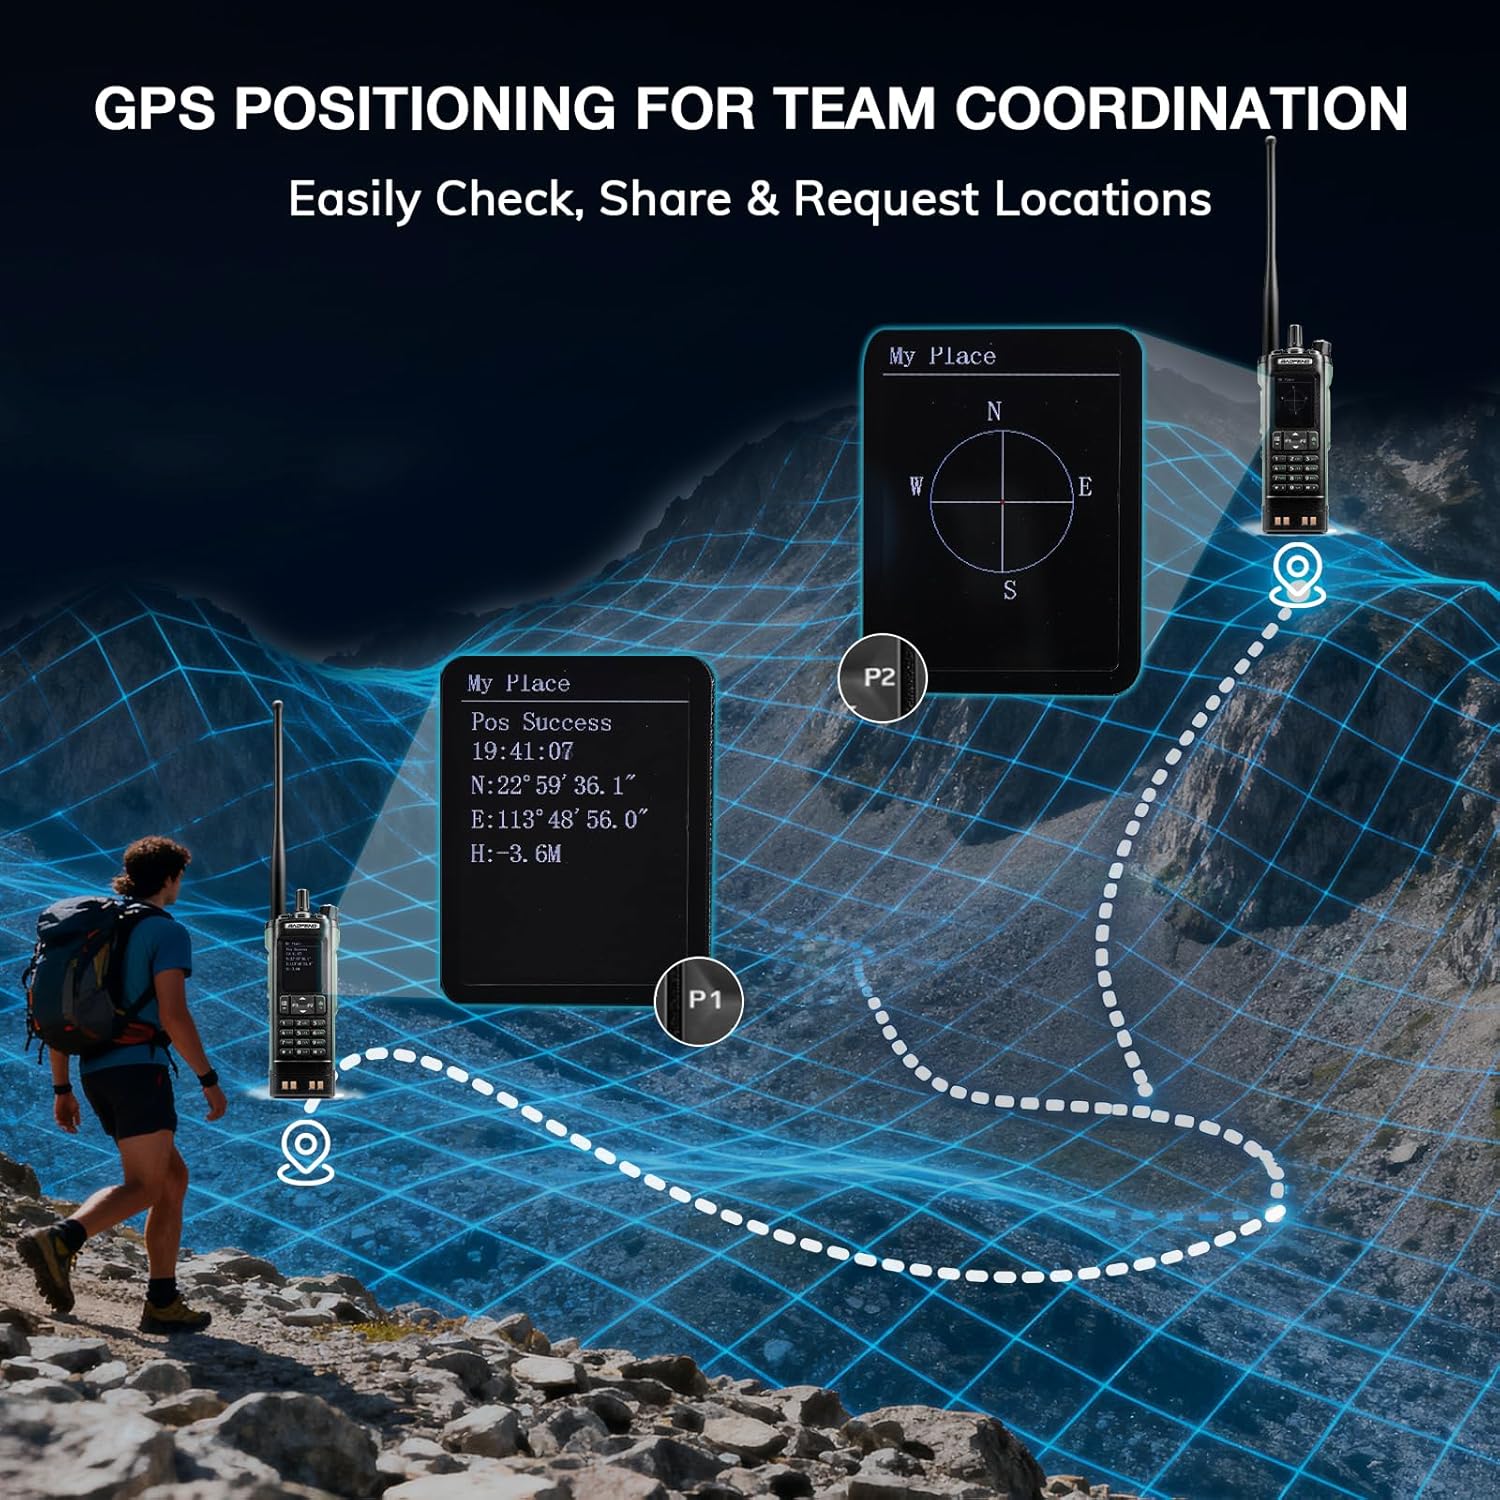
Image: The BAOFENG UV-32 radio's display showing different power output levels (High, Medium, Low) and an external SWR meter for measurement.
6.6 ਪ੍ਰੋਗਰਾਮਿੰਗ ਵਿਕਲਪ
The UV-32 offers several methods for programming frequencies and settings:
- Wireless APP Programming: Connect your radio to a smartphone (iOS/Android) via Bluetooth using the dedicated BT app for quick and wireless programming.
- CHIRP Software: For advanced or bulk programming, use CHIRP software on a PC. Select "UV-17ProGPS" as the radio model in CHIRP.
- ਕੀਪੈਡ ਪ੍ਰੋਗਰਾਮਿੰਗ: Basic programming can be done directly on the radio using the keypad and menu system.
- ਇੱਕ-ਕੁੰਜੀ ਬਾਰੰਬਾਰਤਾ ਕਾਪੀ: This feature allows for easy cloning of frequencies from another radio. Refer to the radio's on-screen prompts or full manual for specific steps.

Image: An illustration depicting the various programming methods available for the BAOFENG UV-32, including mobile app (Bluetooth), CPS software, CHIRP software, and direct keypad input.

Image: Two BAOFENG radios illustrating the one-key frequency copy function, allowing for quick and easy channel cloning between devices.
6.7 GPS ਨੈਵੀਗੇਸ਼ਨ
The integrated GPS module provides real-time location data:
- Access the GPS function through the radio's menu.
- View your current latitude, longitude, and altitude.
- The radio supports sharing your location or requesting coordinates from other team members for improved coordination.

Image: A visual representation of the BAOFENG UV-32's GPS functionality, showing how it displays coordinates and facilitates location sharing for team coordination in outdoor environments.
6.8 Enhanced Airband Reception
For clearer reception of aviation signals, utilize the dedicated AM antenna included with your UV-32. This specialized antenna is designed to provide more accurate and stable airband listening compared to standard UV dual-band antennas.
6.9 NOAA ਮੌਸਮ ਰੇਡੀਓ
The UV-32 can receive NOAA weather alerts. Consult the radio's menu for instructions on how to scan for and select NOAA channels in your area.
6.10 Customizable Side Keys
The radio features four customizable side keys (P1, P2, and two others). These can be programmed via the menu or programming software to quickly access frequently used functions such as scan, monitor, or power level adjustment.

Image: A close-up of the BAOFENG UV-32's side, highlighting the customizable P1 and P2 function keys.
7. ਰੱਖ-ਰਖਾਅ
7.1 Cleaning the Radio
ਰੇਡੀਓ ਦੀ ਸਤ੍ਹਾ ਨੂੰ ਨਰਮ, ਡੀ ਨਾਲ ਪੂੰਝੋ।amp cloth. Do not use harsh chemicals or abrasive cleaners. Ensure all ports are dry before use.
7.2 ਬੈਟਰੀ ਕੇਅਰ
- ਪਹਿਲੀ ਵਰਤੋਂ ਤੋਂ ਪਹਿਲਾਂ ਪੂਰੀ ਬੈਟਰੀ ਚਾਰਜ ਕਰੋ.
- ਬੈਟਰੀ ਨੂੰ ਓਵਰਚਾਰਜ ਕਰਨ ਜਾਂ ਪੂਰੀ ਤਰ੍ਹਾਂ ਨਿਕਾਸ ਤੋਂ ਬਚੋ।
- ਜਦੋਂ ਬੈਟਰੀ ਲੰਬੇ ਸਮੇਂ ਲਈ ਵਰਤੋਂ ਵਿੱਚ ਨਾ ਹੋਵੇ ਤਾਂ ਇਸਨੂੰ ਠੰਢੀ, ਸੁੱਕੀ ਜਗ੍ਹਾ 'ਤੇ ਰੱਖੋ।
7.3 ਸਟੋਰੇਜ
When storing the radio for a long time, remove the battery and store it separately. Keep the radio in a dry, dust-free environment away from direct sunlight and extreme temperatures.
8. ਸਮੱਸਿਆ ਨਿਪਟਾਰਾ
| ਸਮੱਸਿਆ | ਸੰਭਵ ਕਾਰਨ | ਹੱਲ |
|---|---|---|
| ਰੇਡੀਓ ਚਾਲੂ ਨਹੀਂ ਹੁੰਦਾ। | ਬੈਟਰੀ ਸਹੀ ਢੰਗ ਨਾਲ ਸਥਾਪਿਤ ਨਹੀਂ ਹੋਈ ਜਾਂ ਡਿਸਚਾਰਜ ਹੋ ਗਈ ਹੈ। | ਯਕੀਨੀ ਬਣਾਓ ਕਿ ਬੈਟਰੀ ਸੁਰੱਖਿਅਤ ਢੰਗ ਨਾਲ ਜੁੜੀ ਹੋਈ ਹੈ। ਬੈਟਰੀ ਨੂੰ ਪੂਰੀ ਤਰ੍ਹਾਂ ਚਾਰਜ ਕਰੋ। |
| ਸੰਚਾਰਿਤ ਨਹੀਂ ਕੀਤਾ ਜਾ ਸਕਦਾ | Antenna not connected. Incorrect frequency/channel. Low power setting. | Attach antenna. Verify frequency/channel. Increase power level. |
| Poor reception/transmission range | Obstructions. Low power setting. Incorrect antenna. | Move to an open area. Increase power. Ensure correct antenna is used and properly connected. |
| Programming errors with CHIRP/APP | Incorrect radio model selected. Connection issues. Outdated software/firmware. | Ensure "UV-17ProGPS" is selected in CHIRP. Re-establish Bluetooth connection. Update software/firmware if available. |
9 ਨਿਰਧਾਰਨ
| ਵਿਸ਼ੇਸ਼ਤਾ | ਵੇਰਵੇ |
|---|---|
| ਬ੍ਰਾਂਡ | ਬਾਓਫੇਂਗ |
| ਮਾਡਲ ਨੰਬਰ | UV-32 |
| ਚੈਨਲਾਂ ਦੀ ਗਿਣਤੀ | 1000 |
| ਬਾਰੰਬਾਰਤਾ ਸੀਮਾ | UHF, VHF |
| ਪਾਵਰ ਆਉਟਪੁੱਟ | Up to 10W (selectable High, Medium, Low) |
| ਡਿਸਪਲੇ | 2.0" Color Display |
| ਬੈਟਰੀ | 2500mAh Li-ion (included) |
| ਚਾਰਜ ਹੋ ਰਿਹਾ ਹੈ | USB-C, Desktop Charger Base |
| ਵਿਸ਼ੇਸ਼ ਵਿਸ਼ੇਸ਼ਤਾਵਾਂ | Digital Display, Dual Band, USB-C Rechargeable, Wireless APP Programming, Wireless Channel Clone, GPS, NOAA Reception |
| ਕਨੈਕਟੀਵਿਟੀ ਪ੍ਰੋਟੋਕੋਲ | ਬਲੂਟੁੱਥ |
| ਉਤਪਾਦ ਮਾਪ | 1.2"D x 2.2"W x 4"H |
| ਪਾਣੀ ਪ੍ਰਤੀਰੋਧ ਦਾ ਪੱਧਰ | ਪਾਣੀ ਰੋਧਕ ਨਹੀਂ |
10. ਵਾਰੰਟੀ ਅਤੇ ਸਹਾਇਤਾ
Your BAOFENG UV-32 radio comes with an 18-ਮਹੀਨੇ ਦੀ ਵਾਰੰਟੀ. BAOFENG also provides ਜੀਵਨ ਭਰ ਸਹਾਇਤਾ ਇਸ ਉਤਪਾਦ ਲਈ.
For technical assistance, warranty claims, or further inquiries, please visit the official BAOFENG website or contact their customer support directly. Keep your purchase receipt as proof of purchase for warranty services.